Wednesday, December 20, 2017

Solar power

The first time I did PacCup the boat I was on had a generator that we could run to charge the batteries (and make water) - it was quite compared to running the diesel engine and used a lot less fuel.  The second time I did the race the boat I was on had three solar panels (two off the stern and one on the dodger) that handled most of our recharging needs with minimal running of the engine.  Based on Hokulani's energy plan we expect to use about 80 amp hours per day.  While we have upgraded our alternator from 55 Ah to 80 Ah, we really don't want to have to listen to the engine for over an hour each day.  Additionally, it's a good idea to have an alternative means to charge the batteries should we have issues with the engine.  So, we've decided to add solar charging capability.

Of course, once you've made that decision the hard part is deciding where to put the solar panel(s) and how to mount them.  You want to avoid shading on the panel and it needs to be out of the way, further limiting your choices.  We've decided to put the panel on the stern pulpit, but it needed to be able to be moved out of the way should we need to access the emergency rudder system.  Using rail mounts on a stainless steel tube across the stern pulpit seemed the way to go.  We first tried this using hose clamps to mount the tube, but that didn't prevent the tube from rotating due to the weight of the solar panel.  So we opted for jaw clamps commonly used for dodger frames:


These are relatively inexpensive, easy to remove, and hold everything securely.  The panel is a Solara 140 watt Ultra Series with SunPower cells (22.5% efficient!).


With the rail clamps we can rotate the panel for best sun exposure and we can rotate it down out of the way if we need to get to the transom.


Need to clean up the wiring to the deck plug and get a more robust, better waterproof deck plug.


Added a Victron MPPT 75/15 charge controller, it's in the starboard locker directly below the panel.  Then it's just a short run up the wire chase on the port side of the engine to the house batteries.  Also added the little blue tooth dongle that allows me to monitor the solar panel output on my smart phone.  Pretty cool.


Of course, December isn't the best time to test a solar setup.  Later in the spring we'll get everything running and make sure the power plan works as anticipated.


More t-track fun

When we purchased Hokulani she was pretty much a stock one design J120.  Just the factory rigging setup.  Fine if you're doing buoy racing but missing some things if you're ocean racing.  On the way to Hawaii it's likely we'll spend a good chunk of time reaching - anywhere from a close reach to a beam reach - especially early in the race.  In those situations it would be good to be able to sheet head sails to an outside lead.  We thought about adding a folding padeye for this purpose, but you've got to get it placed just right and it may only be optimal for one sail.  So we opted for placing t-track near the toe rail.  Of course, when you place t-track there you want to match the radius of the boat.  Never having done this before I was skeptical as to how easily you could bend 1.25" t-track (when you hold a piece it sure doesn't seem like you can).  Everyone I spoke with said "oh sure, it's no problem".  However, before I started drilling holes in the boat I had to convince myself this was true. 

So, we took some paper to the boat and scribed the radius where we planned to install the track and took measurements regarding track placement (keeping in mind you need to be able to access this from below).


Then we transferred the scribed radius to a piece of plywood at home and attempted to fit the t-track.  You start at one end and once you have 2-3 fastners in place turns out it's pretty easy to bend the track - way further that I thought possible.  You just need to have enough unsecured track to get some leverage.


We continued the process of bending track on the plywood for both the forward and aft sections of track we planned to install.  Then using a 3/32" piece of acrylic made a hole template to transfer the hole pattern to the boat.  You can just flip the template over to do the other side of the boat.


Forward section of the starboard site installed.


We also got the forward port side installed.  We'll be going back to do the aft tracks.  These will be a little more tricky as we have to work around structures below deck (the galley on the port side and a hanging locker and quarter berth head liner on the starboard side).
Now we'll have the ability to have an outside jib lead, a place to rig tweeners (for the Code zero or head sail) and a preventor (for the main) should we need them.  Nice.

Mast track and whisker pole

In my PacCup experience, there has always come a time when flying the spinnaker just isn't practical.  Either the sea state, wind, crew status or all of the above dictate it's better to go with white sails.  Of course when you're in this mode you generally want to point directly at Hawaii, which usually means close to dead down wind.  That means you want to be able to wing out the head sail so that you can project the maximum sail area.  This can be a very stable and fast mode of sailing, with a great VMG.  In order to set up in this fashion you need a pole (either a whisker pole or spinnaker pole) to hold out the head sail on the opposite side from the main sail.  Being a J boat with an asymmetrical spinnaker and bow sprit, we don't have this setup. We were able to pick up a Forespar 12'-22' adjustable whisker pole and installed 1.25" t-track on the forward edge of the mast where we could place the ring to attach the inboard end of the whisker pole.  This is where you get really good at tapping 5/16" holes (12 of them) to attach the t-track to the mast.


Good to go...

main cabin rail

So we've finally started working on things we want to have on the boat rather than things that are required to have on the boat.  The drop leaf table in the main cabin is very nice, but heavy and takes up quite a bit of space.  Plus, while a nice place to eat at the dock or at anchor, it's not so good while underway, especially while healed over.  It does, however, do a good job separating the floor space and provides a place to secure gear/sails.  It would be great to be able to continue doing this, but in a lighter, less bulky way.  How about a rail using the same attachment points on the floor as the table?  We looked in to having a rail fabricated - either stainless or carbon fiber - but the prices we high and higher.  Then we figured how about schedule 80 PVC?  Over the lengths needed that stuff is pretty strong (and about $20).  We just needed a way to attach to the floor.  Enter Cris' machine shop guys who had some spare stainless steel tubes and flat bar they could weld together. We made the flat bar the same profile as the bases of the table (same hole pattern too) and the vertical tubes are about 18", enough to handle the horizontal load on the PVC.


The stainless tubes fit nicely within the inside diameter of the PVC pipe. We took a grinder to the corners of the flat bar to smooth them out so we don't risk catching them on something (i.e., a sail).


Bases before grinding and paint.


Added some flat black paint - and suddenly $20 of PVC looks a lot like $2,000 of carbon fiber...


Tuesday, December 19, 2017

Emergency rudder

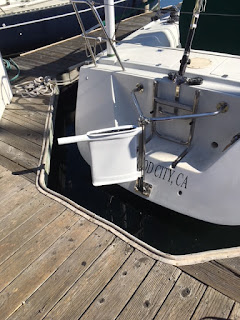
PCER 11.1 deals with emergency steering should the rudder become disabled.  Unfortunately, this is one of the more common equipment problems in past Pacific Cup races and is one of the more expensive and time consuming items to get squared away for the race.  In the two previous times I've done this race we had ER setups that met the race requirement but were certainly less than ideal for deployment and/or use in rough conditions.  In my mind a solution designed around a cassette that only required the crew to drop in a rudder blade was the way to go.  Other J120 have used the Scanmar SOS rudder.  It's functional, but heavy and a bit awkward to deploy.  I spoke with them at the boat show a couple of years ago and they promised to develop a cassette version (which they tested a prototype in the 2016 race), but as yet they don't have a production product.  I spoke with a local composites shop that does custom carbon fiber ER's that I've seen on other PacCup boats - it's very nice, but VERY expensive.  Other boats, especially a local J124, put me in contact with Competition Composites up in Canada (aka, Phil's Foils).  They've designed a carbon cassette and foam/glass blade that would work perfectly.  And with the US$/CAN$ exchange rate, a nice discount.  So, we pulled the trigger once the cassette/blade arrived worked with a local metal shop to build the structure to connect it to the transom.  With everything installed - 40lbs.


Since these pictures we modified how the lines attach to the reverse tiller.  These lines are lead through cheek blocks at the stern corners and to the cabin top winches.  Very easy to control, tacks and jibes the boat effectively.  The metal hardware and cassette will be pre-installed and live on the transom during the race.  If needed we drop the rudder blade in (stored under the aft quarter berth), run the control lines to the winches, and we're good to go.  Process takes less then 30 seconds.

Like a lot of the safety equipment we've installed - we hope to never use it!


Heavy weather sails

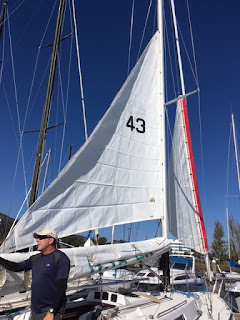
Continuing with PCER's, and of course, just a smart thing to have on an ocean race, is 8.2 which requires boats to carry at least two of three sails: trysail, storm jib, and heavy weather jib.  I'll save you the details, but the maximum size of each sail is defined by the rule based on the boat's J, I, P, and E measurements.  Naturally, we didn't have any of these sails.  Fortunately I connected with another J120 owner who just happened to be cleaning out his garage and looking to get rid of a lot of equipment he didn't need.  I was at his place looking at a smaller spinnaker when I happened to notice a storm jib and trysail in the pile.  Me: "Are you looking to get rid of those too?".  Him: "Sure.  Do you want them?".  Me: "Absolutely!"  Him: "They're yours!".  SCORE!  The trysail was setup to attach to a separate external track on the mast (which we don't have), so we replaced those slugs with ones that will run up the mainsail groove.  We are also required to have sail numbers on the trysail - so another order to Sail Rite for stick on numbers.  The storm jib is a 100 square foot ATN gale sail.  These are set up to attach around a furled head sail or a bare head foil.


So that's two of the three.  The more we thought about the return trip the more we wanted a smaller head sail heading out of Hawaii (a #4, which typically meets the requirements of a heavy weather jib, rather than a #3).  We had a dacron #3 used for cruising and deliveries that's beefy and in great shape, but in the SF Bay can be a hand full on summer afternoons in big wind.  What if we cut that down to make a heavy weather jib?  A trip to the sail loft and a ~100 square foot haircut - presto, a heavy weather jib.


So at the end of the day, we have three of three heavy weather sails.


Sail numbers

Back again to the PCER's - this time 8.5: "A boat shall have the ability to display sail numbers and letters of the size carried on the mainsail by an alternative means when none of the numbered sails is set."  This again, is one of those things you hope to never have to use, but can come in handy in a rescue situation in aiding others to identify your vessel.  A common way to do this is to put the numbers on the lee cloths and lash them to the lifelines if needed.  Of course, this approach leaves you without lee cloths.  Others have canvas fabricated to attach to the lifelines, generally near the cockpit that also doubles at lifeline netting.  Others apply the numbers to the hull up near the bow.  We had an old, UV damaged jib from our previous boat that we cut to size, hemmed the edges, and put grommets in the corners.  We then ordered some stick on numbers from Sail Rite, and presto, an "alternate means to display sail numbers".


With a piece of line attached to each corner, they are easily attached on the forward corners to the stanchion and on the aft corners to the lifeline and toe rail.  Pretty slick and a good way to recycle old sails...

Life raft selection and storage

Continuing with the PCER's, we have rule 10.1, "A boat shall carry adequate inflatable life raft".  You have your choice as to were to store the lift raft (on deck in a hard case, in a locker accessible from the cockpit/deck, or below deck).  We do not have a locker suitable to store a life raft and given the layout of the deck there really isn't an optimal location to store a hard cased life raft in a cradle.  So the only practical solution was a life raft in a valise stored below deck.  The key here was to find a place that wouldn't be in the way, where we could adequately secure the lift raft so it would move around, and could be deployed within 15 seconds (a requirement of the rule for below deck storage).  Here's our solution:


This is a six-person Viking RescYou.  I added four padeyes thru bolted to the galley sink cabinet though which two webbing straps are run to secure the lift raft.  The lift raft isn't under foot and does not block access to the salon bunk even with the lee cloth deployed.  Additionally, the location is only a few feet from the companion way (you can see the stairs in the background of the second picture.  Cindy also sewed up a cover to protect the life raft with some build in pockets for water bottles and/or small gear.  At about 70lbs we have it low in the boat and nearly on center line.  Overall, a good spot.

Check off this item.  Once again, we hope we never have to use it!

2nd manual bilge pump

Hi all, it's been a while since I've updated the blog - been busy with getting the boat ready for next year's race.  My personal goal was to have all the equipment requirements and desired boat modifications done by the end of 2017.  I'm happy to report we're almost there.  The next few posts will be on some of the work completed over the past several months.  First up was Pacific Cup Equipment Requirement (PCER) 3.8, "dewatering".  Specifically, "A boat shall have a two manual bilge pumps of at least a 10 GPM (37.8 liter per minute) capacity. One shall be operable from below deck with the cabin closed with the discharge not dependent on an open hatch".  While most boats have a manual bilge pump operated from the cockpit (which we do), it's rare for a boat to have one operable below deck that can discharge with everything closed up (say in the middle of a storm).  So, you know me, I don't like to put more holes in the boat if it can be avoided, and we already have a discharge hose that exits on the transom for the cockpit operated manual bilge pump - why not tie into that?  We added a "Y" connector to the discharge hose on the output side of the cockpit bilge pump along with a check valve on the side coming from the pump operated below deck:


Turns out the existing manual bilge pump was a Whale MK5, so why not just get another one for the 2nd pump?  We couldn't find a convenient place to permanently mount the 2nd pump so we opted for the provision allowing for "one pump may be mounted on a secure, removable platform".


This pump will be stored behind the settees and there is enough hose coiled up by the "Y" connector that we just need to connect it up and we're good to go.  The rubber pads on the bottom of the board keep it from moving around when in use.  We ended up rotating the pump 90 degrees so the pumping action is aligned with the long side of the board to avoid tipping the pump when in use.

We can check this item off. Let's hope we never have to use it.


Monday, January 30, 2017

Companionway/Hatchboards

The Pacific Cup race operates under, among other rules, the US Sailing Special Equipment Rules.  Under the Safety Equipment requirements, rules 2.1.1 and 2.1.2 related to the boat's companionway hatch and the boat's hatch boards.  Our J120 has a standard sliding companionway hatch and a single poly-carbonate hatch board.  We had already installed a padeye on the single hatch board so that it could be secured to my OYRA offshore requirements:


This works fine, but there can be times offshore where you want a hatch board in place to keep water out of the cabin, but still be able to easily get in and out of the cabin (which is hard to do with the single hatch board unless you have really long legs).  So, a trip to Tap Plastics where I had them fabricate two boards that would fill the space of the current single board.  Now we can just put in the bottom half if necessary to keep water out of the cabin, but now can easily step over it to get in and out of the cabin.  We've got a padeye on each of the two hatch boards so they can be secured in place.


The additional requirement is that the campanionway hatch needs to be able to be "rigidly secured" capable of being locked and unlocked from either above or below deck.  The common way folks do this is to drill a hole through the campanionway hatch and the structure on the side of the campanionway to accept a 3/8" quick release pin.  One pin goes above deck and one below.  Here's an example from Bob's J92:


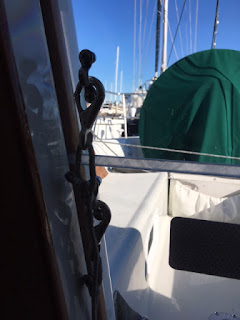
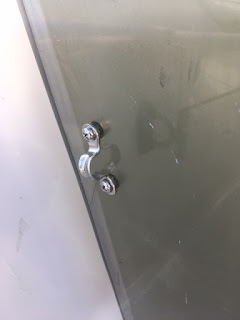
I'm not a huge fan of drilling more holes in the boat, but I do have the quick release pins and could still opt for this solution.  However, we opted for another approach using a spring loaded slide bolt latch from McMaster-Carr.  I got this idea from some of the custom work done by GC Rigging and Composites (of course, their version is made out of carbon fiber).  I had Tap Plastics build a 1" spacer block that was fused to the upper hatch board and then bolted on the latch, replaced the chain that came with the latch with some line, and then drilled a hold in the hatch board to the line would extend to the outside (now the latch can be operated from below and above deck).  The latch catches on the teak board on the bottom of the companionway hatch and makes it "rigidly secure".


Another safety item off the check list.


Mast Butt

The Pacific Cup race operates under, among other rules, the US Sailing Special Equipment Rules.  Under the Safety Equipment requirements, rule 2.6 states "A boat shall have the heel of a keel-stepped mast securely fastened to the mast step or adjoining structure".  Our J120 has a keel stepped mast that sits on a flange made of G10 fiberglass that can be adjusted fore and aft to affect mast rake.  Other than the weight of the mast (which is substantial) holding it on the flange, there is nothing else securing it in place.  Looks like this:


One way to secure the mast would be to put some screws through the base of the mast into the flange, but I don't know how far the flange extends up inside the mast.  To know that for sure you'd have to lift up the mast (an expensive and time consuming process that would require a trip to the boat yard). So, we decided on plan "B".  I had two SS metal L brackets fabricated at Svend's metal shop - 1" wide, 1.25" on each leg, 3/8" thick.  I then used the bolts that hold the mast flange to secure the L brackets.  Tapped two 1/4" holes in the mast to secure a padeye and then lashed everything together with some 1/4" spectra line - thru a D shackle on the L brackets to avoid chafe.  Looks like this now:


When it's time to pull the mast, just remove the lashing and padeye from the side of the mast and you're good to go.  Mast butt secure now.  Check off requirement 2.6!